To add an Indicator, click “+ New Indicator” above the Indicators table. You can also click the “+” next to the name of the result you wish the Indicator to belong to.
In the Indicator pop-out box, you can set the required properties of your indicator – such as Code, Indicator Name, Data Collection Tool, and Project Result. Some fields are mandatory, and some are not. You can always come back later to add in more!
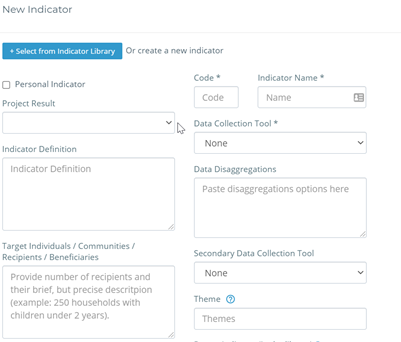
Here are a few tips for the fields:
• A “Personal Indicator” is an Indicator will be only visible to you. Just check the box “Personal Indicator” when you are adding a new one.
• The Data Disaggregation field allows you to collect indicator data separately for multiple groups. This field can also be set during the data analysis stage.
• Adding themes to your indicators enables easier navigation in the Indicator Library when you are creating future projects.
You can add indicators you have already created for other projects through the Indicator Library as well! If you don’t know how to use it – make sure you read the User Guide page on it as it’s a super useful function!